by Rachel Pollock, Crafts Artisan
On deck at work, we are currently well into production on a pair of repertory shows, Shakespeare’s Henry IV and V. The designs for this show are one of those non-era-eras that I like to describe as “postmodern collage”—a mixture of modern and historical styles all blended together to create intriguing looks not tied to any specific time, leather jerkins with jeans and workboots and that type of thing.
I like working on shows done in that way for contemporary audiences because it allows for all the super cool craft stuff that Shakespeare histories pretty much need (like armor!), but it also makes those things accessible to the modern eye in an empathetic way that true period pieces from about the 17th century back don’t. It is very hard, in the 21st century visual milieu, to look like an indomitable, ruthless soldier in, say, pumpkin hose and tights.
Our designer, Jen Caprio, is renting and purchasing the armor because there is just SO much of it needed. If we were doing one of these plays, I could have built some, but both in repertory with the bulk of the rehearsal period happening over our winter vacation, that meant too little time and not enough staff to plan the making of any of the big pieces. Instead, one of the biggest responsibilities I have is to make the armor we’ve rented fit the actors we’ve cast, without altering it in any permanent way, yet maintain the standard of quality that I expect.
One of the things I stress in my classes is that there is the best way to do something, and everything else is a concession you ought to choose to make. In a classroom context, I teach what I believe to be the best way of doing things, since it is easier to make informed concessions required by things like a lack of time/money/labor than it is to break bad habits of shoddy workmanship. It is exciting to see all these pieces of armor from all different sources and makers, and look at the choices they have made in construction (some of which are helpful and others leave me scratching my head). Today I am going to write about how we reversibly altered a piece of leather armor for our productions in such a way as to maintain its level of quality inside and out.


Among regional theatres, the OSF is a powerhouse when it comes to quality armor production. Their pieces are made to withstand not only their own productions’ run, but built to last for many shows and rentals thereafter. They make it policy to cut no corners, and their work is categorically levels of awesome: is it great, or is it spectacular? The artisans turning out their pieces know their work can’t just be crap that looks decent enough from the front row and can cling on for a two-week run, and it’s a pleasure to work on their stuff. OSF costumes are made with longevity and quality at the forefront, because they become assets in the rental side of the company.
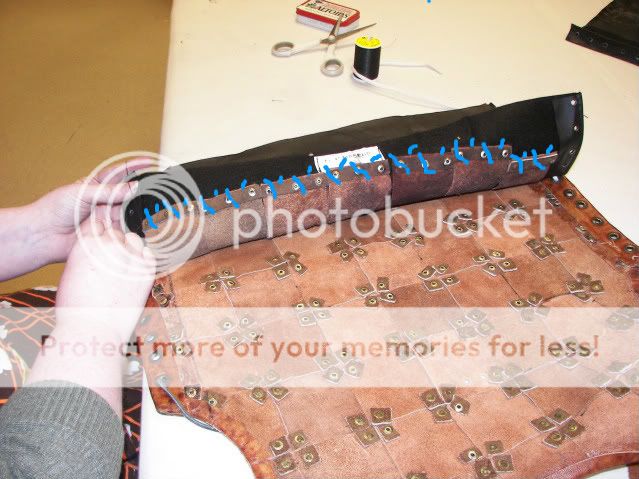
So, if it’s so great and all, what could we possibly need to do to this thing? Well, the design concept does not include any skirtlike hangdowns. We need to use it, but lose the long tabs along the bottom. Obviously, we’re not going to make that happen with scissors and rivets.
For the fittings, to insure that it would work for one of our actors, I had my assistant Whitney use masking tape with a light-tack adhesive to just tape the tabs up inside. The light-tack adhesive would keep them out of the designer’s sightlines for the fitting, without damaging or removing any of that great paint treatment. Tape was fine at this point, because why go to the trouble of a more professional finish if it wasn’t going to fit any of our actors? So, tape-tape-tape, and off it goes to be fit.
A couple days later, it comes back. Yay, we love it on somebody, so we’re using it! Now’s the time to figure out something better than tape, because any tape that will hold up to over a month worth of repertory shows with fight choreography is going to damage the piece, which is not only Not Okay in my own personal book, it’s Way Not Okay in our rental contract.